[AWX] How to install AWX 11.2.0 by Python3 and Docker-Compose
- OS Version: RHEL 7.8
- Ansible Version: 2.9.9 (both yum and pip version)
- Docker CE Version: 19.03.9
- Docker-Compose Version: 1.25.5
- Python2 Version: 2.7.5
- Python3 Version: 3.6.8
- Libselinux-python3 Version: 2.5-15
- PostgreSQL Container Version: 10
- PostgreSQL Version: 11.5-1PGDG
- AWX Container Version: 11.2.0
- Redis Contanier Version: 6.0.3
- Memcached Container Version: 1.6.6
Preparing
Notice
Please note that AWX is a new application for last few years, so the version change very quickly and this will let people need to be carefully on version selection when you want to install it.
Environment
My simulation environment:
Fresh install OS on RHEL 7.5 and upgrade to 7.8, so there will have python2 install on it. This will make your AWX installation more tricky, therefore it's better to create a virtualenv for python3 or fresh install your OS by RHEL 8.
Based on this experience, RHEL 7.7 won't be successful to install AWX because of the
```libselinux-python``` version. On RHEL 7.7 the repo of yum only have python2 version **( I use python3 to install AWX )** and this bug is been solve on **RHEL 7.8** or later version.
According to Redhat official document: RHEA-2020:1165 - Product Enhancement Advisory
If you use python2 to intall AWX then this problem would not bother you.
About
```install.yml``` file there are some module name ```docker_compose```, if your ansible is early than 2.8 then you have to change the module name to ```docker_service```, otherise the install playbook won't work.
Redis vs RabbitMQ
After version 10.0.0 AWX replace RabbitMQ to Redis, so to prevent some Redis warning, we can modify some config.
## WARNING overcommit_memory is set to 0
# Add vm.overcommit_memory=1 to sysctl.conf
vim /etc/sysctl.conf
vm.overcommit_memory=1


## WARNING: The TCP backlog setting of 511 cannot be enforced because /proc/sys/net/core/somaxconn is set to the lower value of 128.
# Add net.core.somaxconn=1024 to sysctl.conf
# But this config not working, still investigate it.
vim /etc/sysctl.conf
net.core.somaxconn=1024

## WARNING you have Transparent Huge Pages (THP) support enabled in your kernel
# Add "echo never > /sys/kernel/mm/transparent_hugepage/enabled" to your /etc/rc.local.
vim /etc/rc.local
echo never > /sys/kernel/mm/transparent_hugepage/enabled

# or just run
echo never > /sys/kernel/mm/transparent_hugepage/enabled
If THP can not disable by above method then you will have to modify
```grub``` config file. Please be noticed changing any config in grub file by wrong method will cause system crashed, so please modify it carefully.
# Add transparent_hugepage=never to the file
vim /etc/default/grub

GRUB_TIMEOUT=5
GRUB_DEFAULT=saved
GRUB_DISABLE_SUBMENU=true
GRUB_TERMINAL_OUTPUT="console"
GRUB_CMDLINE_LINUX="nomodeset crashkernel=auto rd.lvm.lv=vg_os/lv_root rd.lvm.lv=vg_os/lv_swap rhgb quiet transparent_hugepage=never"
GRUB_DISABLE_RECOVERY="true"

# On BIOS-based machines (In this case, I'm using esxi to run my vm, so I choose this option to execute)
grub2-mkconfig -o /boot/grub2/grub.cfg

# On UEFI-based machines
grub2-mkconfig -o /boot/efi/EFI/redhat/grub.cfg

# restart VM

# Check validation.
cat /proc/cmdline
Official System Packages (YUM) vs Python Install Packages (PIP)
There are some packages will conflict for each other or confuse user's usages, so when you want to install AWX you will need to deal with this selection and make your own choice, because everyone's architecture are different.
- Yum: ansible, libselinux-python, pyOpenSSL (in python2?)
- Pip: ansible, selinux, pyOpenSSL
You probably will get some error during your installation, please check the version of the above software package you are using. VirtualEnv will be a better way to avoid the packages problem, but still this is depends on your situation.
Simulation 1 - All in one
Fresh install AWX 11.2.0 without modify any config even password.
Try to simple the install process so would not have any external services.
Preinstall
Package list:
Pip: ansible, selinux, pyOpenSSL
System Packages
yum -y install yum-utils git gcc gcc-c++ nodejs gettext device-mapper-persistent-data lvm2 bzip2 python3-pip vim nano libselinux-python3
yum remove pyOpenSSL
# yum remove ansible --> This depends on your situation, I don't delete it in my simulation 1.
# If you don't remove it or even you remove it, you probably still have to solve the /bin/ansible problem.
yum-config-manager --add-repo https://download.docker.com/linux/centos/docker-ce.repo
yum list docker-ce --showduplicates | sort -r
yum install docker-ce.x86_64 3:19.03.9-3
systemctl start docker && systemctl enable docker && systemctl status docker
Pip Ansible
You can make python3 pip install ansible for your major version, but you will have to remove the system's ansible.
# remove official pacakges' ansible
yum erase ansible

# reboot your VM
reboot

# Python3's pip install
python3 -m pip install ansible

# Check ansible version and python version
ansible --version

# If you can not execute ansible, then you need give it execution priviledge
chmod +x /usr/local/lib/python3.6/site-packages/ansible

# Install pip packages
python -m pip install wheel pyyaml urllib3 pyvmomi pyVim jmespath docker docker-compose awscli boto3 oauthlib purestorage ntlm-auth azure-common azure-keyvault azure-nspkg "pywinrm>=0.3.0" pywinrm[credssp] f5-sdk bigsuds selinux
python -m pip install client
python -m pip install suds
But this is very annoying, so Python Virtualenv will be more easy way to do it.
Virtualenv Method
cd /root
python3 -m pip install pip -U
python3 -m pip install setuptools -U
python3 -m pip install virtualenv
/usr/local/bin/virtualenv ansible29
source /root/ansible29/bin/activate
python -m pip install wheel pyyaml urllib3 pyvmomi pyVim jmespath ansible docker docker-compose awscli boto3 oauthlib purestorage ntlm-auth azure-common azure-keyvault azure-nspkg "pywinrm>=0.3.0" pywinrm[credssp] f5-sdk bigsuds
python -m pip install client
python -m pip install suds
Install AWX
Generate Secret Key (If you need)
openssl rand -base64 30

kf/30tq8S1ESHxDus3U+94RDUKAiIPWdqpx21biT
Git Source Code
cd /root
git clone https://github.com/ansible/awx.git
cd awx
git checkout -b 11.2.0 11.2.0
cd installer/

# Change config if you need, we dont show this part, because we don't change anything in config file.
vim inventory

chmod +x /root/ansible29/bin/*
/root/ansible29/bin/ansible-playbook -i inventory install.yml -vvvv
docker ps -a
You should find out the website goes up.
Bug resolve
Web GUI keep showing upgrading (migrations_notran).
# From Github's Solution. Restart the container
cd /root/.awx/awxcompose/
docker-compose stop && docker-compose rm
docker-compose up -d
This method works for me.
Simulation 2 - Using External PostgreSQL DB
- PostgreSQL Version: 11.5-1PGDG
Fresh install AWX 11.2.0 and change PostgreSQL to external node, using external nginx to proxy AWX web and other config.
Preinstall
Package list:
Yum: ansible, libselinux-python3
Pip: pyOpenSSL
DB Instance Pacages
# External repository
https://yum.postgresql.org/repopackages.php
https://yum.postgresql.org/11/redhat/rhel-7-x86_64/repoview/postgresql11-server.html
wget https://download.postgresql.org/pub/repos/yum/reporpms/EL-7-x86_64/pgdg-redhat-repo-latest.noarch.rpm
yum install pgdg-redhat-repo-latest.noarch.rpm

# Or using your own local repository (If you have)
vim /etc/yum.repos.d/postgresql.repo
[Postgresql]
name=Postgresql Local Repository
baseurl=http://xxxxxxxxxxx/3rdparty/postgresql/
enabled=1
gpgcheck=0

# Installation
yum install postgresql11-server postgresql11-contrib postgresql11 -y

/usr/pgsql-11/bin/postgresql-11-setup initdb

systemctl enable postgresql-11.service
systemctl start postgresql-11.service
Change DB Config
# Change admin password
psql -U postgres
ALTER USER postgres WITH PASSWORD 'xxxxxxx'
\q

# Allow all connection
vim /var/lib/pgsql/11/data/postgresql.conf
listen_addresses = '*'

vim /var/lib/pgsql/11/data/pg_hba.conf
host    all all 0.0.0.0/0   trust

systemctl restart postgresql-11.service

# Create DB and User
psql --host=10.0.0.10 --port=5432 --username=postgres
create user awx with superuser password 'awxpass';
create database awx;
grant all on DATABASE awx to awx;
grant all privileges on database awx to awx;
Container Instance Packages
yum -y install yum-utils git gcc gcc-c++ nodejs gettext device-mapper-persistent-data lvm2 bzip2 python3-pip vim nano libselinux-python3
yum remove pyOpenSSL
# yum remove ansible --> This depends on your situation, I don't delete it in my simulation.
# If you don't remove it or even you remove it, you probably still have to solve the /bin/ansible problem.
yum-config-manager --add-repo https://download.docker.com/linux/centos/docker-ce.repo
yum list docker-ce --showduplicates | sort -r
yum install docker-ce.x86_64 3:19.03.9-3
systemctl start docker && systemctl enable docker && systemctl status docker
Create Virtualenv
cd /root
python3 -m pip install pip -U
python3 -m pip install setuptools -U
python3 -m pip install virtualenv

# Config execute path for root account to use.
vim ~/.bash_profiles
PATH=${PATH}:${HOME}/bin:/usr/local/bin

source ~/.bash_profile

mkdir -p /var/lib/awx/custom-venv
cd /var/lib/awx/custom-venv
virtualenv python36

source /var/lib/awx/custom-venv/python36/bin/activate
python -m pip install wheel pyyaml urllib3 pyvmomi pyVim jmespath ansible docker docker-compose awscli boto3 oauthlib purestorage ntlm-auth azure-common azure-keyvault azure-nspkg "pywinrm>=0.3.0" pywinrm[credssp] f5-sdk bigsuds
python -m pip install client
python -m pip install suds
Install AWX
cd /root
git clone https://github.com/ansible/awx.git
cd awx
git checkout -b 11.2.0 11.2.0
cd installer/
vim inventory
Config file:
localhost ansible_connection=local ansible_python_interpreter="/usr/bin/env python3"

[all:vars]

# Remove these lines if you want to run a local image build
# Otherwise the setup playbook will install the official Ansible images. Versions may
# be selected based on: latest, 1, 1.0, 1.0.0, 1.0.0.123
# by default the base will be used to search for ansible/awx_web and ansible/awx_task
dockerhub_base=ansible

# Openshift Install
# Will need to set -e openshift_password=developer -e docker_registry_password=$(oc whoami -t)
#           or set -e openshift_token=TOKEN
# openshift_host=127.0.0.1:8443
# openshift_project=awx
# openshift_user=developer
# openshift_skip_tls_verify=False
# openshift_pg_emptydir=True

# Kubernetes Install
# kubernetes_context=test-cluster
# kubernetes_namespace=awx
# Optional Kubernetes Variables
# pg_image_registry=docker.io
# pg_serviceaccount=awx
# pg_volume_capacity=5
# pg_persistence_storageClass=StorageClassName
# pg_cpu_limit=1000
# pg_mem_limit=2

# Kubernetes Ingress Configuration
# You can use the variables below to configure Kubernetes Ingress
# Set hostname
# kubernetes_ingress_hostname=awx.example.org
# Add annotations. The example below shows an annotation to be used with Traefik but other Ingress controllers are also supported
# kubernetes_ingress_annotations={'kubernetes.io/ingress.class': 'traefik', 'traefik.ingress.kubernetes.io/redirect-entry-point': 'https'}
# Specify a secret for TLS termination
# kubernetes_ingress_tls_secret=awx-cert

# Kubernetes and Openshift Install Resource Requests
# These are the request and limit values for a pod's container for task/web/redis/memcached/management.
# The total amount of requested resources for a pod is the sum of all
# resources requested by all containers in the pod
# A cpu_request of 1500 is 1.5 cores for the container to start out with.
# A cpu_limit defines the maximum cores that that container can reserve.
# A mem_request of 2 is for 2 gigabytes of memory for the container
# A mem_limit defines the maximum memory that that container can reserve.
# Default values for these entries can be found in ./roles/kubernetes/defaults/main.yml
# task_cpu_request=1500
# task_mem_request=2
# task_cpu_limit=2000
# task_mem_limit=4
# web_cpu_limit=1000
# web_mem_limit=2
# redis_cpu_limit=1000
# redis_mem_limit=3
# memcached_cpu_limit=1000
# memcached_mem_limit=2
# management_cpu_limit=2000
# management_mem_limit=2

# Common Docker parameters
awx_task_hostname=awx
awx_web_hostname=awxweb
#postgres_data_dir="~/.awx/pgdocker"
postgres_data_dir="/var/lib/awx/pgdocker"
host_port=8080
#host_port_ssl=443
#ssl_certificate=
# Optional key file
#ssl_certificate_key=
docker_compose_dir="~/.awx/awxcompose"

# Required for Openshift when building the image on your own
# Optional for Openshift if using Dockerhub or another prebuilt registry
# Required for Docker Compose Install if building the image on your own
# Optional for Docker Compose Install if using Dockerhub or another prebuilt registry
# Define if you want the image pushed to a registry. The container definition will also use these images
# docker_registry=172.30.1.1:5000
# docker_registry_repository=awx
# docker_registry_username=developer


# Set pg_hostname if you have an external postgres server, otherwise
# a new postgres service will be created
# pg_hostname=postgresql
pg_hostname=xxxxxxx
pg_username=xxxxx
# pg_password should be random 10 character alphanumeric string, when postgresql is running on kubernetes
# NB: it's a limitation of the "official" postgres helm chart
pg_password=xxxxxx
pg_database=xxxxx
pg_port=5432
#pg_sslmode=require

# The following variable is only required when using the provided
# containerized postgres deployment on OpenShift
# pg_admin_password=postgrespass

# Use a local distribution build container image for building the AWX package
# This is helpful if you don't want to bother installing the build-time dependencies as
# it is taken care of already.
# NOTE: IMPORTANT: If you are running a mininshift install, using this container might not work
#                  if you are using certain drivers like KVM where the source tree can't be mapped
#                  into the build container.
#                  Thus this setting must be set to False which will trigger a local build. To view the
#                  typical dependencies that you might need to install see:
#                  installer/image_build/files/Dockerfile.sdist
# use_container_for_build=true

# This will create or update a default admin (superuser) account in AWX, if not provided
# then these default values are used
admin_user=admin
admin_password=xxxxxxxx

# Whether or not to create preload data for demonstration purposes
create_preload_data=True

# AWX Secret key
# It's *very* important that this stay the same between upgrades or you will lose the ability to decrypt
# your credentials
secret_key=xxxxxxxxxxxxxxxxx

# Build AWX with official logos
# Requires cloning awx-logos repo as a sibling of this project.
# Review the trademark guidelines at https://github.com/ansible/awx-logos/blob/master/TRADEMARKS.md
# awx_official=false

# Proxy
#http_proxy=http://proxy:3128
#https_proxy=http://proxy:3128
#no_proxy=mycorp.org

# Container networking configuration
# Set the awx_task and awx_web containers' search domain(s)
#awx_container_search_domains=example.com,ansible.com
# Alternate DNS servers
#awx_alternate_dns_servers="10.1.2.3,10.2.3.4"

# AWX project data folder. If you need access to the location where AWX stores the projects
# it manages from the docker host, you can set this to turn it into a volume for the container.
#project_data_dir=/var/lib/awx/projects
project_data_dir=/var/lib/awx/projects

# AWX custom virtual environment folder. Only usable for local install.
#custom_venv_dir=/opt/my-envs/
custom_venv_dir=/var/lib/awx/custom-venv/python36/

# CA Trust directory. If you need to provide custom CA certificates, supplying
# this variable causes this directory on the host to be bind mounted over
# /etc/pki/ca-trust in the awx_task and awx_web containers.
#ca_trust_dir=/etc/pki/ca-trust/source/anchors

# Include /etc/nginx/awx_extra.conf
# Note the use of glob pattern for nginx
# which makes include "optional" - i.e. not fail
# if file is absent
#extra_nginx_include="/etc/nginx/awx_extra[.]conf"
Install Bug Resolving
### Beforce running install check your ansible's python
ansible --version

### If you see your python still show python 2.7.5, this means the /bin/ansible still point to your yum version not your pip version.

### Here are some method I try to used to solve this problem.
## Method 1: Use the command below, not to replace the original link. (Not Working)
# Failed by
# "msg": "Aborting, target uses selinux but python bindings (libselinux-python) aren't installed!"
ll /var/lib/awx/custom-venv/python36/bin/
chmod +x /var/lib/awx/custom-venv/python36/bin/*
python $(which ansible) --version
python $(which ansible-playbook) -i inventory install.yml -vvv

## Method 2: Remove system's ansible (Not Working)
# Failed by
# "msg": "Aborting, target uses selinux but python bindings (libselinux-python) aren't installed!"
yum remove ansible
/var/lib/awx/custom-venv/python36/bin/ansible-playbook -i inventory install.yml -vvv
python $(which ansible-playbook) -i inventory install.yml -vvv

## Method 3: Recreate Virtualenv with --system-site-packages (Working)
deactivate
rm -rf /var/lib/awx/custom-venv/python36/
cd /var/lib/awx/custom-venv
virtualenv --system-site-packages python36

source /var/lib/awx/custom-venv/python36/bin/activate
python -m pip install wheel pyyaml urllib3 pyvmomi pyVim jmespath ansible docker docker-compose awscli boto3 oauthlib purestorage ntlm-auth azure-common azure-keyvault azure-nspkg "pywinrm>=0.3.0" pywinrm[credssp] f5-sdk bigsuds
python -m pip install client
python -m pip install suds
chmod +x /var/lib/awx/custom-venv/python36/bin/*
cd /root/awx/installer/

# Run install
ansible-playbook -i inventory install.yml -vvv
docker ps -a

# Bug
# You probably will get some error for example, I saw my Web GUI shows AWX upgrading but never stop.....(migrations_notran problem) then I restart the container services and Web works fine.
docker-compose stop && docker-compose rm
docker-compose up -d
docker-compose restart

## Method 4: I think there must have different solution, but I don't have much time to try it all.

Using Extend Nginx to proxy
We can use docker volume to mount nginx conf folder to local VM, but if you don't want to do that way. You can use local VM's nginx to proxy your request.
So When your are install AWX, you have to change the host_port to other port number.
# New port number
host_port=8080
host_port_ssl=8443
Then create your SSL key to apply for SSL Certification License.
# Create CSR
openssl genrsa -out www.xxxxxx.com.key 4096
openssl rsa -in www.xxxxxx.com.key -out www.xxxxxx.com.key
openssl req -new -key www.xxxxxx.com.key -out www.xxxxxx.com.csr
Apply your SSL certificate and put the CRT file to the place you want.
Then install nginx.
yum install -y nginx
vim /etc/nginx/nginx.conf
Config file.
# For more information on configuration, see:
#   * Official English Documentation: http://nginx.org/en/docs/
#   * Official Russian Documentation: http://nginx.org/ru/docs/

user nginx;
worker_processes auto;
error_log /var/log/nginx/error.log;
pid /run/nginx.pid;

# Load dynamic modules. See /usr/share/doc/nginx/README.dynamic.
include /usr/share/nginx/modules/*.conf;

events {
    worker_connections 1024;
}

http {
    log_format  main  '$remote_addr - $remote_user [$time_local] "$request" '
                      '$status $body_bytes_sent "$http_referer" '
                      '"$http_user_agent" "$http_x_forwarded_for"';

    access_log  /var/log/nginx/access.log  main;
    error_log   /var/log/nginx/error.log;

    sendfile            on;
    tcp_nopush          on;
    tcp_nodelay         on;
    keepalive_timeout   65;
    types_hash_max_size 2048;

    include             /etc/nginx/mime.types;
    default_type        application/octet-stream;

    # Load modular configuration files from the /etc/nginx/conf.d directory.
    # See http://nginx.org/en/docs/ngx_core_module.html#include
    # for more information.
    include /etc/nginx/conf.d/*.conf;

    server {
        listen       80 default_server;
        listen       [::]:80 default_server;
        server_name  _;
        root         /usr/share/nginx/html;

        # Load configuration files for the default server block.
        include /etc/nginx/default.d/*.conf;

        location / {
        }

        error_page 404 /404.html;
            location = /40x.html {
        }

        error_page 500 502 503 504 /50x.html;
            location = /50x.html {
        }
    }

# Settings for a TLS enabled server.
#
    server {
        listen       443 ssl http2 default_server;
        listen       [::]:443 ssl http2 default_server;
        server_name  _;
#        root         /usr/share/nginx/html;

        ssl_certificate "/etc/nginx/ssl/www.xxxxxx.com.crt";
        ssl_certificate_key "/etc/nginx/ssl/www.xxxxxx.com.key";
        ssl_session_cache shared:SSL:1m;
        ssl_session_timeout  10m;
        ssl_ciphers HIGH:!aNULL:!MD5;
        ssl_prefer_server_ciphers on;

        # Load configuration files for the default server block.
        include /etc/nginx/default.d/*.conf;

        location / {
            proxy_set_header Host $host;
            proxy_set_header X-Real-IP $remote_addr;
            proxy_set_header X-Forwarded-For $proxy_add_x_forwarded_for;
            proxy_set_header X-Forwarded-Proto $scheme;
            proxy_set_header Upgrade $http_upgrade;
            proxy_set_header Connection "upgrade";
            proxy_pass http://10.0.0.11:8080/;
        }

        error_page 404 /404.html;
            location = /40x.html {
        }

        error_page 500 502 503 504 /50x.html;
            location = /50x.html {
        }
    }

}
Nginx Web can not show anything
If you don see anything come from nginx and when you check the docker log see this log blew:
docker logs awx_web
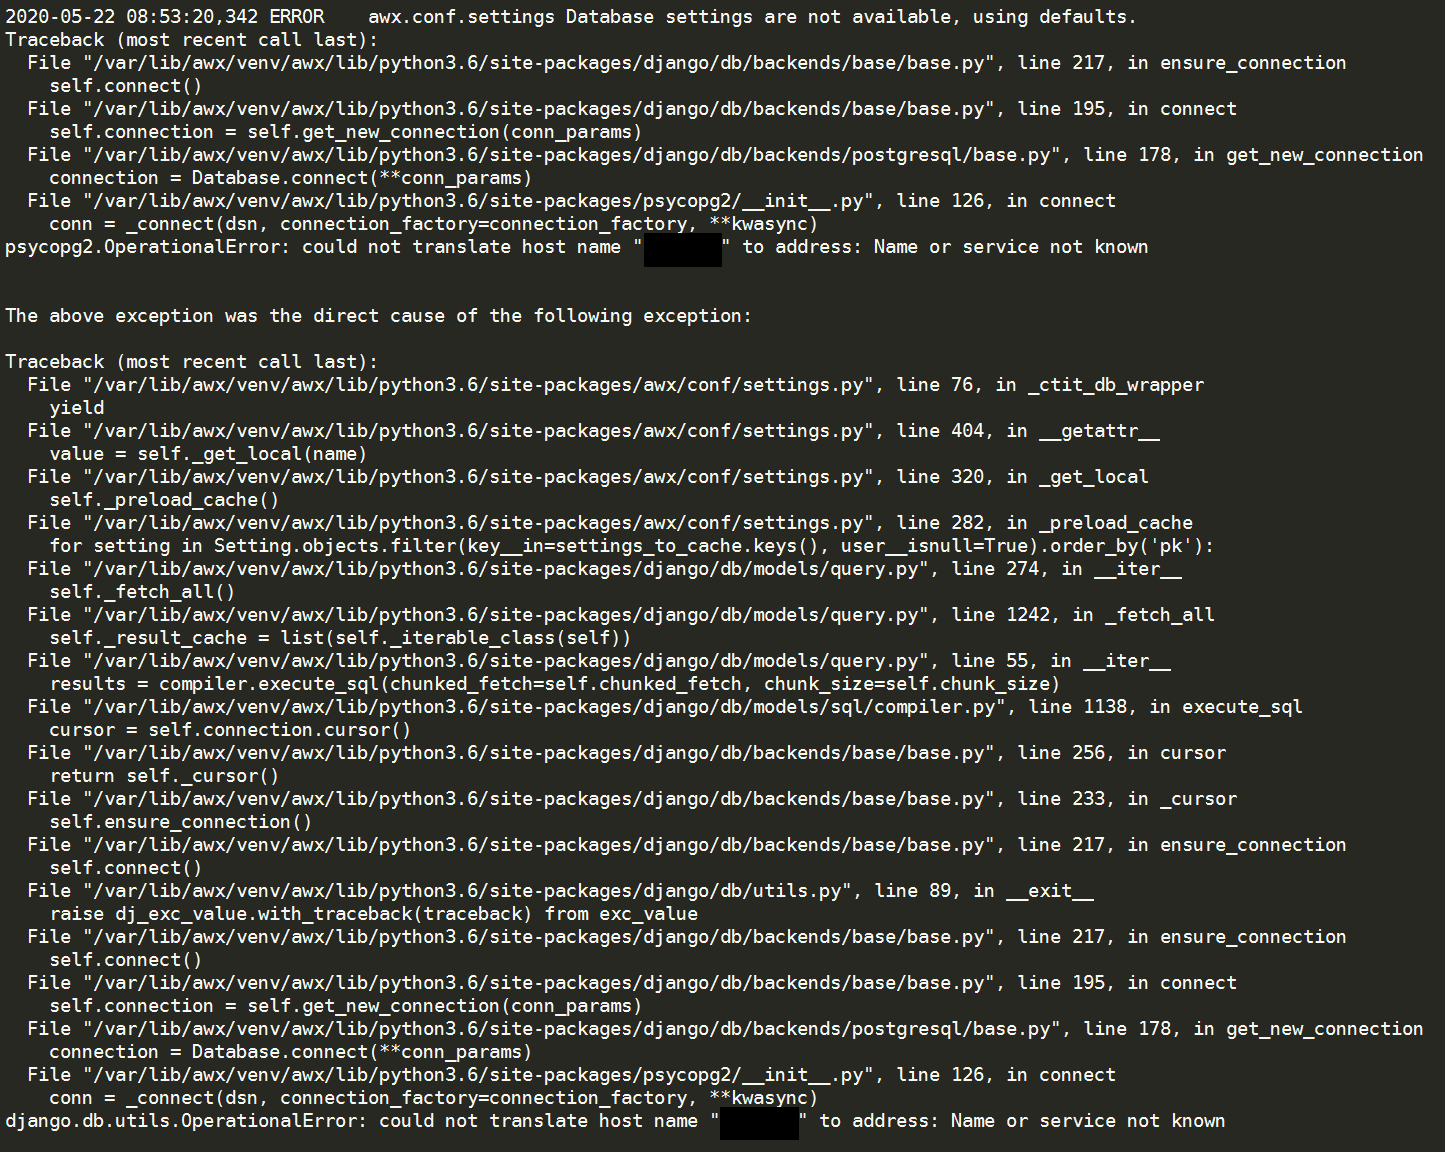
This error message shows that your nginx can not find out the external PostgreSQL DB, so I reinstall awx and change pg_hostname to different combination such as change to IP, FQDN(not shortname), edit
```/etc/hosts``` file, using awx_alternate_dns_servers but still get the same error message.
I even find article that shows you have to change the docker file because of the
```base.py```, but I try not to modify official file.
Then I try to login to awx_web to investigate why hostname can not used. I discover that my old AWX have gateway, but my new AWX do not have.
docker network ls
docker network inspect bridge

# My Old AWX
        "IPAM": {
            "Driver": "default",
            "Options": null,
            "Config": [
                {
                    "Subnet": "172.17.0.0/16",
                    "Gateway": "172.17.0.1"
                }
            ]
        },


# My New AWX
        "IPAM": {
            "Driver": "default",
            "Options": null,
            "Config": [
                {
                    "Subnet": "172.17.0.0/16"
                }
            ]
        },
Finally, I find a way to solve this problem.
systemctl daemon-reload
systemctl stop docker && systemctl start docker && systemctl status docker
docker network inspect bridge
After above command my docker gateway shows up..........weired.

LDAP Config
# LDAP SERVER URL:
ldap://10.0.0.1:389,ldap://10.0.0.2:389

# LDAP BIND DN:
CN=xxxxx,OU=xxxxxxx,DC=xxxx,DC=xxxx,DC=COM

# LDAP BIND PASSWORD:

# LDAP USER DN TEMPLATE:
N/A

# LDAP GROUP TYPE:
NestedActiveDirectoryGroupType

# LDAP REQUIRE GROUP:
N/A

# LDAP DENY GROUP:
N/A

# LDAP START TLS:
Not open

# LDAP USER SEARCH:
[
 "OU=xxxxxxx,DC=xxxx,DC=xxxx,DC=COM",
 "SCOPE_SUBTREE",
 "(sAMAccountName=%(user)s)"
]

# LDAP GROUP SEARCH:
[
 "DC=xxxx,DC=xxxx,DC=COM",
 "SCOPE_SUBTREE",
 "(objectClass=group)"
]

# LDAP ATTRIBUTE SEARCH:
{
 "first_name": "givenName",
 "last_name": "sn",
 "email": "userPrincipalName"
}

# LDAP GROUP TYPE PARAMETERS:
N/A

# LDAP USER FLAGS BY GROUP:
N/A

# LDAP ORGANIZATION MAP:
N/A

# LDAP TEAM MAP:
N/A
Then save your config and use your AD account to login then change your account to system administrator.
That's all.
Reference
Selinux, Python, virtualenv, chroot and ansible don't play nice.
A server error has occurred (/migrations_notran)
migrations_notran does not redirect if AWX is fully up
Why can't I find ansible when I install it using setup.py?
AWX 11.0.0 Logstash connection refused
How to Install Ansible AWX with Nginx Reverse Proxy on Ubuntu 18.04 LTS
AWX fails to start with docker-compose after upgrade to 10.0.0
AWX A server error has occured
set package version in Ansible
Ansible: How to change Python Version
Known issue with virtualenv and ansible on SELinux-enabled hosts
libselinux-python with virtualenvs require manual copy
Could not translate host name “db” to address using Postgres, Docker Compose and Psycopg2
Ansible open sources Ansible Tower with AWX
How To Install Ansible AWX on CentOS RHEL 7/8
How to install Ansible AWX on centos 7
UnixHTTPConnectionPool(host='localhost', port=None): Read timed out. (read timeout=60)
docker-compose up times out with UnixHTTPConnectionPool
Could not translate host name “db” to address using Postgres, Docker Compose and Psycopg2
Missing Gateway field in bridge network inspect
A server error has occurred when opening UI after fresh installdisable transparent hugepages)
CentOS / RHEL 7 : How to disable Transparent Huge pages (THP)
Lab: Ansible, Python3, and Virtualenvs on CentOS and RHEL
Can't run Docker container due device mapper error
How to properly handle conflicting distutils libraries with pip?